Category - How to?

Yahoo! Mail is upgrading: What it means for you

I’ve just received an E-mail from yahoo! Mail Team informing and suggesting me to upgrade from current version of my yahoo account to the latest version. From this mail, I’ve also realized that I’ve been a fan of yahoo for five years already.:D

Since I like testing new things, I can’t wait until five months later to use the final version. Now, I’m using beta of the latest version, and I’ve found some more interesting features there.

I’ve put the original mail I got, and I’ve capture the screen before and after updating so that you can see some changes for your consideration of changing your current version or not… Cheers,

[slideshow]

Dear Dara saoyuth,Thank you for being a Yahoo! Mail user for the past 5 year(s). We look forward to bringing you a faster, safer, and friendlier Yahoo! Mail soon.

In the coming months, we will invite you to upgrade your account dara_saoyuth@yahoo.comto the newest version of Yahoo! Mail. All Yahoo! Mail users will be invited to upgrade. If do you not wish to wait, you can have the newest Yahoo! Mail today.

Upgrade Now

What You Can Look Forward To

• Faster email

• Latest Yahoo! Mail spam-protection technology

• Friendlier design

• Unlimited email storage to keep everything you want

Learn more about the newest version of Yahoo! Mail. When you upgrade to the newest version of Yahoo! Mail, everything in your account (messages, folders, contacts, etc.) will be there.

You Can Upgrade TodayYou can upgrade now to the newest Yahoo! Mail if your browser is Internet Explorer 7, Firefox 3, Safari 4, or Chrome 5, or newer.

Upgrade Now

If you do not have any of these browsers, you must first update your browser (it’s fast and free), and then return to this email and click the Upgrade Now button.

If you don’t upgrade now, we recommend that you do it soon. Your current version of Yahoo! Mail will be available for the next few months, but you will eventually need to upgrade it to the newest version of Yahoo! Mail, or review Yahoo! Mail Help for other options.

Thank you for being a loyal Yahoo! Mail user.

We hope you will enjoy the newest version of Yahoo! Mail.

Yahoo! Mail Team


01/05/2011
By: Dara Saoyuth

Creative Commons License
Yahoo! Mail is upgrading: What it means for you by DARA Saoyuth is licensed under a Creative Commons Attribution-NoDerivs 3.0 Unported License.

5 ways to drive visitors to your blog/website

Numbers of blogs and websites keep increasing from day to day. Not many people visiting  can be a  frustrating thing for blog and website owners. There are plenty of way to improve your blog/website state, but I’d like to raise 5 main points for Student Blog visitors. I think some of you also own at least your personal blog, so let’s have a look together. Cheers,

1. Use Social Network

Image representing Twitter as depicted in Crun...

Image via CrunchBase

Social network programs are very popularly nowadays especially Facebook, Twitter, Hi5, etc. In addition to having more friends online, you can improve your blog/website visitors by announcing it on these social programs. It is an easy way and you don’t have to pay for this.

2. Search Engine Optimization (SEO)

Tag bar

Wordpress allows you to put tag here / by: Dara Saoyuth

The Web is full of great content that will never be seen outside of the author’s screen because the writer has failed to understand that just a few simple tweaks in the blogging process can increase search-engine visibility.

Search Engine including Google, Bing, and Yahoo is another powerful way to bring visitors to your blog/website. Search Engine will show your blog/website when someone search any keyword existed in your blog/website contents.

You can improve search engine capacity by learning how to use tag including heading tag and title tag.

Tag bar

Tag bar / by: Dara Saoyuth

3. Create relationship with another sites

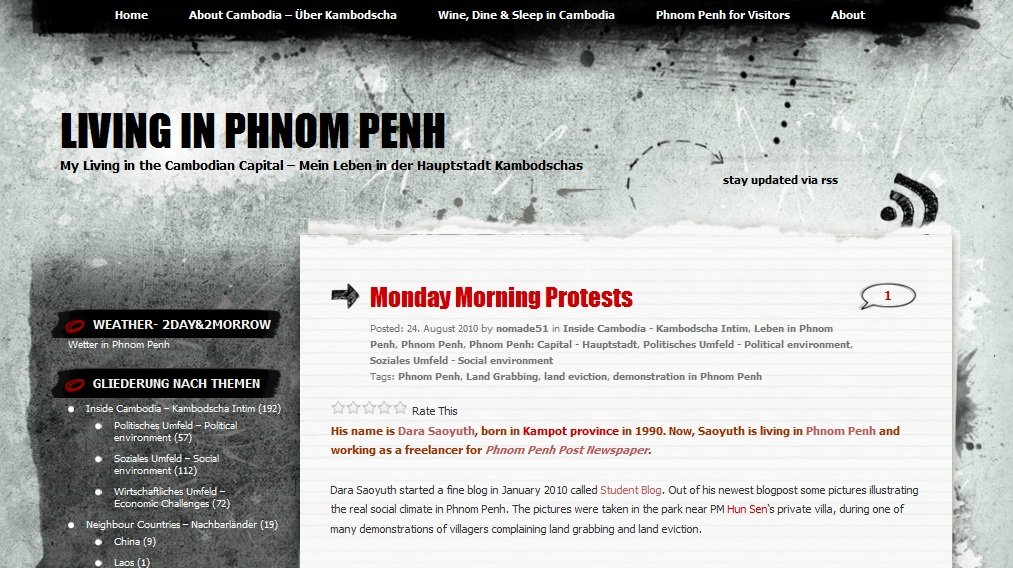
Living in Phnom Penh & Student Blog

Living in Phnom Penh & Student Blog / By: Dara Saoyuth

You cannot live alone on the earth and so as your website/blog that it cannot stay isolate on the internet world.

When you have more friends on the internet, you will have a big amount of visitors.

You can improve it by putting link to the other people’s website/blog and they will link you back.

4. Offline Advertising

Another easy to make the other people know your blog/website  is to  deliver posters, business cards that include your web address to your friend or people you meet.

Those people will remember yours longer. You can also advertise it on newspaper or magazine.

5. Online advertising

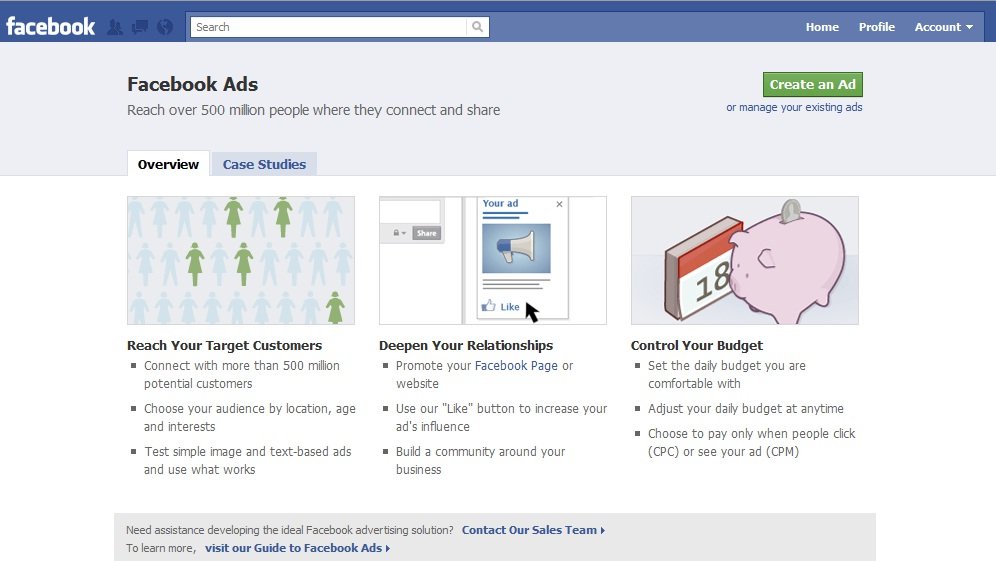
Facebook ads sample

Facebook ads sample / by: Dara Saoyuth

Well, if you have money, you should consider this method. You can buy space from other famous websites to put yours in them. Or you can use Facebook Ads or Google ads.


By: Dara Saoyuth
25/01/2011

Study Tips: 12 Things I Wish My Students Knew

Have you ever felt that some of your classmates are doing better than you? Do they have big brain? Or do they study harder?

You may surprise to hear that some of them not having bigger brain nor studying harder than you, but they know how to study.

Yesterday, I watch some videos on YouTube about how to study effectively, and I eventually met a videos series which I think they are good to share to Student Blog visitors.

More than 30 years of teaching, a memory trainer Graham Best, spent his time figuring out exactly what students could do to improve their studying.

I have put links to the complete series of 12 videos and hope you enjoy watching it. If you know your friends who are struggling, please feel free to share these wonderful videos series with them. Cheers,

[youtube=http://www.youtube.com/watch?v=sJ956-utKyM&fs=1&hl=en_US]
  1. First Things First
  2. Be Prepared
  3. Get Organized
  4. Learn to Read Right
  5. Schedule Your Time
  6. Listen and Take Notes
  7. Hand in Neat Work
  8. Ask
  9. Help Others
  10. Test Yourself
  11. Do More Than You’re Asked
  12. Use What You Learn
Posted by: Dara Saoyuth
17/01/2011
If you know a student who is struggling, you might want to alert them to these videos as a means of helping them.

3 Easy Steps to Show Microsoft Office Word 2003 Menu in Microsoft Office Word 2007/2010

In the mid 2008, I decided to use Microsoft office 2007 instead of Microsoft office 2003 because office 2007 equipped with a lot of new interesting features. However, now, I’m using Microsoft office 2010 beta since I like keeping myself up to date with new technology.

I remembered the first few weeks I change from office 2003 to office 2007 that it’s very hard for me to find tools I needed since it’s very different in how the menu tabs are showed in the new version.

2

Microsoft Word 2003 Menu Tab

1

Microsoft Word 2010 Menu Tab

In order to reduce the difficulties most users face when they decided to upgrade their Microsoft office to 2007 or 2010, I hope the below solution would be helpful:

  1. In order to insert Microsoft Word 2003 Menu into your Microsoft Word 2007/2010 menu tab, you need to install “UBitMenu” program. You can find that program by clicking here.
  2. After you get this program on your computer, it’s time for you to install it now. Before installing the program, make sure that you’ve already closed all Microsoft Office Application.
    3

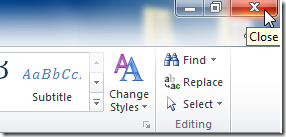
    Close all Microsoft Word applications

  3. After you finished installing “UBitMenu” program, run your Microsoft Office Application again. At this time, you can see the “Menu” tab appeared next to Home tab.
    4

    The new "Menu" tab appears after you've installed UBitMenu

    Clicking on the Menu tab, you’ll see a lot of menu appear and those icons are very similar to Microsoft Office Word 2003.

    5

    You now can see sth very similar to what's in Microsoft Word 2003

Hope this article help you especially for those who just upgrade to Microsoft Office Word 2007/2010.

Written by: Dara Saoyuth

Written date: 01/03/2010

UBitMenu program Click Here


How to Turn off Autoplay of USB drives and CDs in Window 7

For me, it’s really annoying to have autoplay dialogue box appear every time I insert my USB drives or my CDs into my pc. I’m not a big fan of this feature, so I’ve never kept it on. Since it’s a bit different in appearance of window xp comparing to window 7, I decided to make this article up accompanied with a video tutorial. Hopefully, this article will help you:

Question: What is Autoplay Dialogue Box?

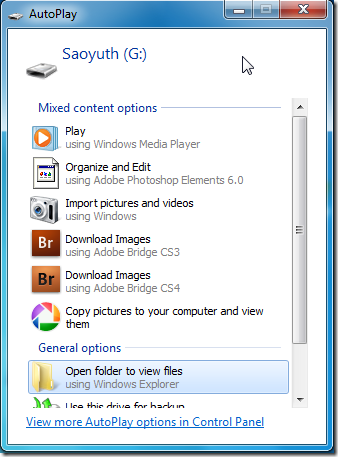
Answer: Autoplay Dialogue Box is a box appeared when you insert your USB drives or CDs into your computer. See the below picture:

2-23-2010 3-56-03 PM

Autoplay Dialogue Box

Question: Why should you turn Autoplay of USB drives and CDs off?

Answer:

  • It’s really annoying to have a box appear on your screen every time you insert your USB drives or CDs.
  • To prevent the autorun USB viruses infected to your computer.

Question: How to turn Autoplay of USB drives and CDs off?

Answer:

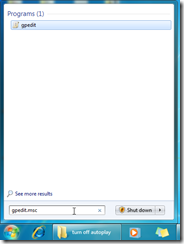
  1. Type “gpedit.msc” in the Start Search Box, and then press ENTER to open Local Group Policy Editor.
    2

    Type "gpedit.msc" in start search box

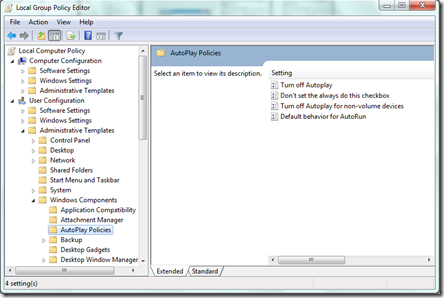
  2. Under Computer Configuration, expand Administrative Templates, expand Windows Components > click Autoplay Policies.
    3

    Local Group Policy Editor box

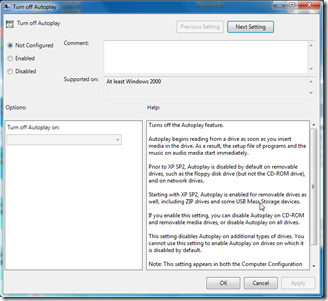
  3. In the right pane, double-click Turn off Autoplay to open the Properties box.
    4

    "Turn off Autoplay" box

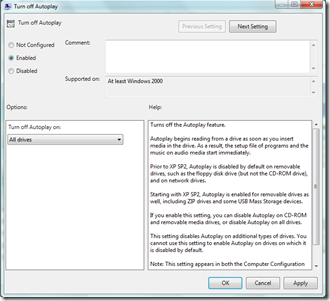
  4. Click Enabled, and then select All drives in the Turn off Autoplay on box to disable Autorun on all drives.
    5

    How to turn off autoplay

  5. Do the same as instruction 1 to 4 for Administrative Templates under User Configuration.
    6

    Do the same for administrative template under "User Configuration"

Written by: Dara Saoyuth

Written date: 23/02/2010

Video tutorial for this tip click here

9 easy steps for upgrading window 7 from beta to final release version

Today I’ve just finished upgrading my laptop operating system from beta version (pre-release version/Evaluation Copy) to window 7 Final Release.

Spending a few hours testing, I was succeeded in upgrading my window operating system without any error appear. By following the 9 easy steps below I believe that you will be able to do that on your own:

  1. You must have a window 7 setup software (usually in DVD) and then copy the whole DVD onto your local hard drive.

    Copy window 7 DVD into your hard drive

  2. Browse through the folder you’ve just copied to find the “source” folder. In the “source” folder search for the file “cversion.ini”.

    Search for folder "source"

    Search for file "cversion.ini"

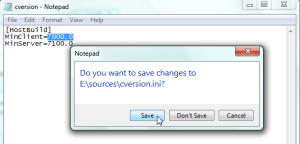
  3. Double click the “cversion.ini” file and then change the number as in the picture below (from 7233.0 to 7000.0):

    Change from 7233.0 to 7000.0

    Change from 7233.0 to 7000.0

  4. Close the above notepad and save what you have changed.

    Save your change in Notepad

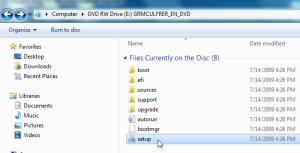
  5. Finally, you can now upgrading your new version of window 7 by just clicking the file “setup.exe” located in your window folder.

    Find file "setup.exe" in window 7 folder

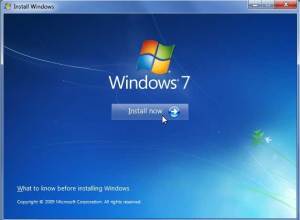
    When the new dialog box appear, just click Install now and wait until it finish.

    Click on "install now"

  6. Another dialog box will appear after you click install now. In this box click on Upgrade.

    Click upgrade

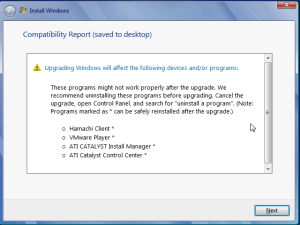
  7. Now, the system is checking all the programs in your previous version of window to know whether it support the new operating system or not. Wait a minute for this process and when it finish it’ll appear another dialog box. You would be happy if you can not find any program listed in this box because it means that all your programs in the previous window support with the new version of window. Otherwise, it’ll appear as below box:

    Dialoge box showing the unsupported programs

    If some of your programs are listed in the above box, please close that box and go to uninstall those program before you continue upgrading.

  8. When all of your programs support with the new version of window, you can now click next in the Compatibility Report (Save to desktop) box. (figure number 7)
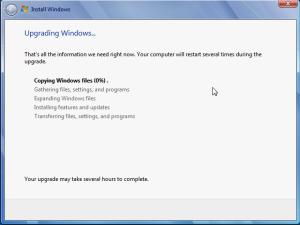
  9. After you press next, the system starts to upgrade the new operating system into your computer. This process take a bit long, so please wait and be patient.

    Your upgrade is in process

    Written date: 19/02/2010
    Written by: Dara Saoyuth